Tutorial: ESP32 Bluetooth audio streamer
1. Introduction
The ESP32 microcontroller contains several useful features, and in particular a built-in Wi-Fi and Bluetooth module that makes it easy to add wireless capabilities to an electronics project. In this tutorial you will learn how to stream audio from a Bluetooth-enabled device such as a smartphone, to the ESP32 microcontroller using the ESP-IDF framework from Espressif.
This tutorial will cover the basics and should get you on the way to understand the APIs so that you can continue on to implement additional functionality to make your product usable in a more practical setting. If you find any bugs or have other feedback, I’d be happy to hear from you at bokfink@pm.me.

Figure 1: Bluetooth audio streamer overview
As shown in Figure 1, the smartphone sends digital audio data to the ESP32 using the Bluetooth protocol stack. The ESP32 then transmits the digital audio using the Inter-IC Sound (I2S) interface standard to a Digital to Analogue Converter (DAC). The DAC outputs an analogue audio signal, but the signal is too weak to drive a speaker or headphones at sufficient volume, so an audio amplifier is used to amplify the signal.
1.1. Prerequisites
- Install ESP-IDF version 5.0 or later.
- Connect an ESP32 development board for programming using USB or UART. This tutorial was tested using an ESP32-DevKitC board.
- Connect the ESP32 to the PCM5102 DAC using I2S. This tutorial follows the typical applications schematic on page 26 of the PCM5102A datasheet.
- Connect the PCM5102 DAC to an amplifier with speakers or headphones.
You can find the source code and circuit schematics on Sourcehut. If you would like to make a printed circuit board (PCB), there are also KiCad PCB layouts that you can adjust to your liking and produce. This tutorial will focus on the firmware for the ESP32 and not the electronics. It is assumed that you are well versed with electronic circuits and can follow the datasheets to set everything up on a breadboard.
1.2. Bluetooth stack
The ESP32 microcontroller provides both Bluetooth Classic and Bluetooth Low Energy. For this project, you will learn to use Bluetooth Classic. Bluetooth specifies a number of profiles that describe common use cases, such as streaming music from a smartphone to an ESP32. The ESP-IDF framework provides Application Programming Interfaces (APIs) to make it easier to implement this in software. The basic sequence of implementing the appropriate APIs is to:
- Register a callback function to handle events from various services.
- Implement a select case statement to handle the different types of events that are sent by the ESP-IDF framework.
2. Create and configure a new project
Create a new ESP-IDF project and build it to make sure that your development toolchain is working. Follow the ESP32 getting started guide if this is the first time you are setting up the ESP-IDF build environment. The example below uses the project name bt-audio-streamer, but you can call it whatever you like.
$ idf.py create-project bt-audio-streamer
<---SNIP--->
$ cd bt-audio-streamer
$ idf.py build
<---SNIP--->
By default, the Bluetooth component of ESP-IDF is not enabled. To
enable it, open menuconfig by running the idf.py script from
the bt-audio-streamer directory.
$ idf.py menuconfig
There are many options in the menuconfig, but for now enable only
what you need:
- Enable
Component config -> Bluetooth --> Bluetoothby toggling the checkmark ON using the space bar. - Choose
Bluedroid Optionsand toggle ONClassic Bluetooth (NEW)under the new options that appeared belowBluetooth. - Toggle ON the
A2DP (NEW)option that became visible. - Toggle OFF
Bluetooth Low Energy (NEW). - Configure the Bluetooth controller by choosing
Controller Options
   -> Bluetooth controller mode ... -> BR/EDR Only
. - Save the file by pressing the
Skey and quit by using theQkey.
If you try to call Bluetooth related functions without making the
changes to menuconfig, the linker would not be able to find the
required Bluetooth header files.
3. Connect to the ESP32 using Bluetooth
3.1. Initialize and enable the Bluetooth controller
The esp_bt_controller_init() function seems like a good place to start
to initialize the Bluetooth controller. It takes a configuration
structure of type esp_bt_controller_config_t. There are a lot of
member fields in this struct, but luckily there is a macro called
BT_CONTROLLER_INIT_CONFIG_DEFAULT that has common values
populated. The function, struct and macro are all defined in
esp_bt.h so you must include that header file first.
#include "esp_bt.h"
#include "esp_err.h"
#include "esp_log.h"

  void app_main(void)
  {
    esp_err_t ret;

    /* Configure the Bluetooth controller with default values */
    esp_bt_controller_config_t bt_config = BT_CONTROLLER_INIT_CONFIG_DEFAULT();
    ret = esp_bt_controller_init(&bt_config);
    if (ret != ESP_OK) {
      ESP_LOGE("Bluetooth Controller", "Could not initialize Bluetooth Controller: %s", esp_err_to_name(ret));
    } else {
      ESP_LOGI("Bluetooth Controller", "Successfully initialized Bluetooth Controller");
    }
  }
If you see any compilation errors, make sure that you have included
the esp_err.h and esp_log.h header files. Flash and monitor the
code to your ESP32 using idf.py flash monitor and hopefully see
messages stating that the Bluetooth controller has been successfully
initialized.
Next, enable the Bluetooth controller using the
esp_bt_controller_init() function.
ret = esp_bt_controller_enable(ESP_BT_MODE_CLASSIC_BT);
if (ret != ESP_OK) {
  ESP_LOGE("Bluetooth Controller", "Could not enable Bluetooth Controller: %s", esp_err_to_name(ret));
} else {
  ESP_LOGI("Bluetooth Controller", "Successfully enabled Bluetooth Controller");
}
You may notice an error message from the monitor log, saying:
E (452) phy_init: esp_phy_load_cal_data_from_nvs: NVS has not been initialized. Call nvs_flash_init before starting WiFi/BT.
NVS stands for non-volatile storage, and the ESP32 needs NVS
configured to store Bluetooth configuration data. In the ESP32, the
NVS library is mainly used for storing many small key-value pairs. To
store large blobs, it is better to use a FAT filesystem with wear
levelling. As of 2022, ESP32 uses flash memory partitions labeled
nvs or data. See the ESP32 NVS Documentation for more detailed
information.
To address the error, follow the advice of the error message and
initialize NVS using the nvs_flash_init() function.
As an interlude, since this function has many potential error
messages, you may want to refactor the code a little bit by adding a
tag variable to store the application’s tag for the ESP_LOGX
macros. In this example tag is set to “BT APP”, but you can name it
whatever you’d like.
const char *tag = "BT APP";

/* Initialize Non-volatile Storage (Flash) for Bluetooth PHY data to be stored */
ret = nvs_flash_init();
if (ret != ESP_OK) {
  ESP_LOGE(tag, "Failed to initialize NVS flash: %s", esp_err_to_name(ret));
} else {
  ESP_LOGI(tag, "Successfully initialized NVS flash");
}
After building the updated code and flashing it to the ESP32, you should see messages similar to the listing below in your monitor:
I (450) BT APP: Successfully initialized NVS flash
I (450) BTDM_INIT: BT controller compile version [5688ed5]
I (450) system_api: Base MAC address is not set
I (450) system_api: read default base MAC address from EFUSE
I (460) BT APP: Successfully initialized Bluetooth Controller
I (460) phy_init: phy_version 4670,719f9f6,Feb 18 2021,17:07:07
I (1030) BT APP: Successfully enabled Bluetooth Controller
Since you are only using Bluetooth Classic, you can free up the
controller memory concerned with Bluetooth Low Energy (BLE). To do
this, call the esp_bt_controller_mem_release() function.
/* Free up controller memory used by BLE */
ret = esp_bt_controller_mem_release(ESP_BT_MODE_BLE);
if (ret != ESP_OK) {
  ESP_LOGE(tag, "Failed to release BLE memory: %s", esp_err_to_name(ret));
} else {
  ESP_LOGI(tag, "Successfully released BLE memory");
}
3.2. Initialize and enable the Bluedroid stack
Now that you have the Bluetooth controller enabled, perform similar
actions to initialize and enable Bluedroid stack. The functions
esp_bluedroid_init() and esp_bluedroid_enable() are defined in the
esp_bt_main.h header file, so make sure to include it.
  /* Initialize and enable Bluedroid stack */
ret = esp_bluedroid_init();
if (ret != ESP_OK) {
  ESP_LOGE(tag, "Failed to initialize Bluedroid stack: %s", esp_err_to_name(ret));
} else {
  ESP_LOGI(tag, "Successfully initialized Bluedroid stack");
}

ret = esp_bluedroid_enable();
if (ret != ESP_OK) {
  ESP_LOGE(tag, "Failed to enable Bluedroid stack: %s", esp_err_to_name(ret));
} else {
  ESP_LOGI(tag, "Successfully enabled Bluedroid stack");
}
3.3. Refactor the initialization code
There are now quite a few different function calls inside app_main(),
so if you prefer to keep functions relatively small, this is a good
time to refactor a little bit and put some of the initialization code
into their own functions.
Put the NVM related code into a function called init_nvs():
static void init_nvs(void)
{
  /* Initialize Non-volatile Storage (Flash) for Bluetooth PHY data to be stored */
  ret = nvs_flash_init();
  if (ret == ESP_OK) {
    ESP_LOGI(tag, "Successfully initialized NVS flash");
  } else {
    ESP_LOGE(tag, "Failed to initialize NVS flash: %s", esp_err_to_name(ret));
  }

  /* Free up controller memory used by BLE */
  ret = esp_bt_controller_mem_release(ESP_BT_MODE_BLE);
  if (ret == ESP_OK) {
    ESP_LOGI(tag, "Successfully released BLE memory");
  } else {
    ESP_LOGE(tag, "Failed to release BLE memory: %s", esp_err_to_name(ret));
  }
}
Put the Bluetooth and Bluedroid related code into a function called
init_bt():
static void init_bt(void)
{
  /* Configure the Bluetooth controller with default values */
  esp_bt_controller_config_t bt_config = BT_CONTROLLER_INIT_CONFIG_DEFAULT();
  ret = esp_bt_controller_init(&bt_config);
  if (ret == ESP_OK) {
    ESP_LOGI(tag, "Successfully initialized Bluetooth Controller");
  } else {
    ESP_LOGE(tag, "Could not initialize Bluetooth Controller: %s", esp_err_to_name(ret));
  }

  /* Enable Bluetooth controller */
  ret = esp_bt_controller_enable(ESP_BT_MODE_CLASSIC_BT);
  if (ret == ESP_OK) {
    ESP_LOGI(tag, "Successfully enabled Bluetooth Controller");
  } else {
    ESP_LOGE(tag, "Could not enable Bluetooth Controller: %s", esp_err_to_name(ret));
  }

  /* Initialize and enable Bluedroid stack */
  ret = esp_bluedroid_init();
  if (ret == ESP_OK) {
    ESP_LOGI(tag, "Successfully initialized Bluedroid stack");
  } else {
    ESP_LOGE(tag, "Failed to initialize Bluedroid stack: %s", esp_err_to_name(ret));
  }

  ret = esp_bluedroid_enable();
  if (ret != ESP_OK) {
    ESP_LOGE(tag, "Failed to enable Bluedroid stack: %s", esp_err_to_name(ret));
  } else {
    ESP_LOGI(tag, "Successfully enabled Bluedroid stack");
  }
}
Then call these two functions from app_main().
void app_main(void)
{
  /* Initialize the Non-volatile flash memory */
  init_nvs();
  /* Initialize Bluetooth controller and Bluedroid stack */
  init_bt();
}
3.4. Set discoverability and connectability
The Bluetooth stack is now up and running on the
ESP32. Congratulations! However, you will not be able to connect to
the ESP32 using a Bluetooth client like a smartphone — yet. First you
need to set the appropriate mode for the ESP32 to be discoverable. The
esp_bt_gap_set_scan_mode() function lets you do that by passing in the
appropriate enumerations defined in the esp_bt_connection_mode_t and
esp_bt_discovery_mode_t struct types. Since you would like the ESP32
device to be both connectable and discoverable, put this code in a new
function and call it set_discoverability().
static void set_discoverability(void)
{
    /* Set the connectability and scannability of the device */
  ret = esp_bt_gap_set_scan_mode(ESP_BT_CONNECTABLE, ESP_BT_GENERAL_DISCOVERABLE);
  if (ret == ESP_OK) {
    ESP_LOGI(tag, "Successfully set the discoverability and connectability mode");
  } else if (ret == ESP_ERR_INVALID_ARG) {
    ESP_LOGE(tag, "Failed to set discoverability and connectability mode: invalid arguments");
  } else if (ret == ESP_ERR_INVALID_STATE) {
    ESP_LOGE(tag, "Failed to set discoverability and connectability mode: Bluetooth stack not yet enabled");
  } else {
    ESP_LOGE(tag, "Failed to set discoverability and connectability mode: %s", esp_err_to_name(ret));
  }
}
Then update app_main() to call this function:
/* Set the connectability and scannability of the device */
set_discoverability();
If the function call was successful, you should be able to see the ESP32 device as discoverable when scanning for Bluetooth devices using a smartphone, for example. It will show up as ESP32 by default. However, if you try to connect to it, there will be some warnings popping up in the monitor:
W (79553) BT_HCI: hcif conn complete: hdl 0x80, st 0x0
W (79633) BT_HCI: hcif link supv_to changed: hdl 0x80, supv_to 8000
W (79783) BT_HCI: hcif link supv_to changed: hdl 0x80, supv_to 32000
W (79863) BT_L2CAP: L2CAP - rcvd conn req for unknown PSM: 25
W (79893) BT_HCI: hcif link supv_to changed: hdl 0x80, supv_to 8000
W (79993) BT_L2CAP: L2CAP - rcvd conn req for unknown PSM: 23
W (80033) BT_HCI: hcif link supv_to changed: hdl 0x80, supv_to 32000
W (81163) BT_HCI: hcif disc complete: hdl 0x80, rsn 0x13
These warnings come from the lower layers of the Bluedroid stack. HCI stands for Host Controller Interface, and L2CAP stands for Logical Link Control and Adaptation Protocol. You will not be dealing with these low level layers in this tutorial. If you are interested in finding out more about the details of the Bluedroid stack, you can read section 1.2.2. onward in the ESP32 Bluetooth Architecture documentation.
3.5. Implement an event handler using a callback function
The ESP-IDF Bluetooth stack is event driven. Events like a Bluetooth connection request or a play command from a phone need to be handled by your code. The way to do this is to declare an event handler function that the underlying ESP32 system can call whenever a relevant event occurs. This type of function is also called a callback function.
You will write the callback function to handle
relevant events, but first you need to register the callback
function name with the system so that it knows which callback
function to call. Call the esp_bt_gap_register_callback() function
from init_gap() to register the GAP profile event handler and call
init_gap() from app_main().
static void init_gap(void)
{
  /* Register callback function to handle Bluetooth events. */
  ret = esp_bt_gap_register_callback(gap_handler);
  if (ret == ESP_OK) {
    ESP_LOGI(tag, "Successfully registered gap_handler callback function");
  } else {
    ESP_LOGE(tag, "Failed to register gap_handler callback function: %s", esp_err_to_name(ret));
  }
}
This way, whenever an event is sent regarding GAP, the gap_handler()
function will be called. Next implement the definition of the
gap_handler() function:
static void gap_handler(esp_bt_gap_cb_event_t event, esp_bt_gap_cb_param_t *params)
{
  ESP_LOGI(tag, "gap_handler event: %d", event);
}
esp_bt_gap_cb_t is defined as a function pointer and takes two
arguments. The first is the event itself, which is of the enumeration
type esp_bt_gap_cb_event_t. In the documentation for this type, you
will see a list of all the various events that can be handled (17 to
be precise). You will only implement handlers for some of them in this
tutorial. The second argument is a union of structs containing the GAP
state callback parameters. Its type is esp_bt_gap_cb_param_t.
All of these APIs are declared in the esp_gap_bt_api.h header, so
make sure to include it in your code before trying to build the
project again.
Since there are 17 enumerations in esp_bt_gap_cb_event_t, there are
17 possible events that could be sent to gap_handler(). Some of
them may not even be necessary to handle, so why not just try to run
the code now and see what events (if any) will be sent your way. In
the current implementation of gap_handler() it simply writes to
the log the enumeration number of the event that is passed to the
function. Then you can cross-reference that back to the
esp_bt_gap_cb_event_t type.
However, when you run the code and try to connect to the ESP32
device, you still get these warning messages and no sign of any events
being sent to gap_handler(). What could be going on?
I (1173) BT APP: Successfully enabled Bluetooth Controller
I (1193) BT APP: Successfully initialized Bluedroid stack
I (1253) BT APP: Successfully enabled Bluedroid stack
I (1263) BT APP: Successfully set the discoverability and connectability mode
I (1263) BT APP: Successfully registered callback function
W (16183) BT_HCI: hcif conn complete: hdl 0x80, st 0x0
W (16273) BT_HCI: hcif link supv_to changed: hdl 0x80, supv_to 8000
W (16433) BT_HCI: hcif link supv_to changed: hdl 0x80, supv_to 32000
W (16523) BT_L2CAP: L2CAP - rcvd conn req for unknown PSM: 25
W (16543) BT_HCI: hcif link supv_to changed: hdl 0x80, supv_to 8000
W (16653) BT_L2CAP: L2CAP - rcvd conn req for unknown PSM: 23
W (16683) BT_HCI: hcif link supv_to changed: hdl 0x80, supv_to 32000
W (17753) BT_HCI: hcif disc complete: hdl 0x80, rsn 0x13
It turns out that you need to initiate a Bluetooth profile first, in this case the A2DP sink profile. So that’s what will do next.
3.6. Initialize Advanced Audio Distribution Profile (A2DP)
Similarly to the previous initialization examples, create a new
function called init_a2dp() to initialize and register a callback
function for A2DP.
static void init_a2dp(void)
{
  /* Initialize the A2DP sink profile */
  ret = esp_a2d_sink_init();
  if (ret == ESP_OK) {
    ESP_LOGI(tag, "Successfully initialized A2DP sink");
  } else if (ret == ESP_ERR_INVALID_STATE) {
    ESP_LOGE(tag, "Failed to initialize A2DP sink: Bluetooth stack not yet enabled");
  } else {
    ESP_LOGE(tag, "Failed to initialize A2DP sink: %s", esp_err_to_name(ret));
  }

  /* Register A2D handler function */
  ret = esp_a2d_register_callback(a2d_handler);
  if (ret == ESP_OK) {
    ESP_LOGI(tag, "Successfully registered A2D handler function");
  } else if (ret == ESP_ERR_INVALID_STATE) {
    ESP_LOGE(tag, "Failed to register A2D handler function: Bluetooth stack not yet enabled");
  } else {
    ESP_LOGE(tag, "Failed to register A2D handler function: %s", esp_err_to_name(ret));
  }
}
Next, implement a simple handler.
static void a2d_handler(esp_a2d_cb_event_t event, esp_a2d_cb_param_t *params) {
  ESP_LOGI(tag, "a2d_handler event: %d", event);
}
Call the init function from app_main().
/* Initialize the A2DP sink profile */
init_a2dp();
When you run this code, you’ll see that the logs now contain some additional information:
I (1153) BT APP: Successfully enabled Bluetooth Controller
I (1163) BT APP: Successfully initialized Bluedroid stack
I (1223) BT APP: Successfully enabled Bluedroid stack
I (1233) BT APP: Successfully set the discoverability and connectability mode
I (1243) BT APP: Successfully registered callback function
W (1243) BT_BTC: A2DP Enable without AVRC
I (1253) BT APP: gap_handler event: 10
I (1293) BT APP: Successfully initialized A2DP sink
I (1293) BT APP: Successfully registered A2D handler function
First, there is a warning that A2DP is enabled without AVRC. You will
address this shortly. But next, there is an event sent to the
gap_handler() function. The number of the event is 10, so if you
look that event number up in the esp_bt_gap_cb_event_t documentation
and count the enumerations starting from 0, it turns out that 10
refers to the ESP_BT_GAP_CONFIG_EIR_DATA_EVT event. This event
refers to an Extended Inquiry Response (EIR). EIR is a way for a
Bluetooth device to provide additional information about itself
without having to establish a connection. This is very useful for
performance reasons. To read more about the details of EIR, you can
read section 4.2.1.1.1. (p. 256) of the Bluetooth Core Specification
v5.3. However, you will not use that information in this tutorial.
3.7. Connect to ESP32
If you try to connect your smartphone to the ESP32 using Bluetooth, you will see the following additional information in the log.
W (340623) BT_HCI: hcif conn complete: hdl 0x80, st 0x0
W (340703) BT_HCI: hcif link supv_to changed: hdl 0x80, supv_to 8000
W (340903) BT_HCI: hcif link supv_to changed: hdl 0x80, supv_to 32000
W (341003) BT_L2CAP: L2CAP - rcvd conn req for unknown PSM: 23
W (341013) BT_HCI: hcif link supv_to changed: hdl 0x80, supv_to 8000
W (341383) BT_APPL: new conn_srvc id:19, app_id:0
W (341393) BT_BTC: AVRC not Init, not using it.
W (344593) BT_HCI: hci cmd send: sniff: hdl 0x80, intv(400 800)
W (344613) BT_HCI: hcif mode change: hdl 0x80, mode 2, intv 800, status 0x0
I (344613) BT APP: gap_handler event: 13
W (344673) BT_HCI: hci cmd send: unsniff: hdl 0x80
W (345183) BT_HCI: hcif mode change: hdl 0x80, mode 0, intv 0, status 0x0
I (345193) BT APP: gap_handler event: 13
W (348383) BT_HCI: hci cmd send: sniff: hdl 0x80, intv(400 800)
W (348403) BT_HCI: hcif mode change: hdl 0x80, mode 2, intv 800, status 0x0
I (348413) BT APP: gap_handler event: 13

W (91153) BT_HCI: hcif conn complete: hdl 0x80, st 0x0
W (91243) BT_HCI: hcif link supv_to changed: hdl 0x80, supv_to 8000
W (91433) BT_HCI: hcif link supv_to changed: hdl 0x80, supv_to 32000
W (91533) BT_HCI: hcif link supv_to changed: hdl 0x80, supv_to 8000
W (91543) BT_L2CAP: L2CAP - rcvd conn req for unknown PSM: 23
I (91543) BT APP: a2d_handler event: 0
I (91623) BT APP: a2d_handler event: 2
I (91623) BT APP: a2d_handler event: 5
W (91793) BT_APPL: new conn_srvc id:19, app_id:0
I (91803) BT APP: a2d_handler event: 0
W (91803) BT_BTC: AVRC not Init, not using it.
W (95003) BT_HCI: hci cmd send: sniff: hdl 0x80, intv(400 800)
W (95013) BT_HCI: hcif mode change: hdl 0x80, mode 2, intv 800, status 0x0
I (95013) BT APP: gap_handler event: 13
W (95123) BT_HCI: hci cmd send: unsniff: hdl 0x80
W (95173) BT_HCI: hcif mode change: hdl 0x80, mode 0, intv 0, status 0x0
I (95173) BT APP: gap_handler event: 13
W (98373) BT_HCI: hci cmd send: sniff: hdl 0x80, intv(400 800)
W (98393) BT_HCI: hcif mode change: hdl 0x80, mode 2, intv 800, status 0x0
I (98403) BT APP: gap_handler event: 13
First, your phone is now able to connect to the ESP32 over
Bluetooth. Second, there are some more events, specifically four
events sent to the a2d_handler() and three events sent to the
gap_handler().
Look at the gap_handler() event number 13 first. That is the
ESP_BT_GAP_MODE_CHG_EVT event. Since you are being sent these
events, implement some very rudimentary code to “handle” them. For
now, all the handler does is to print something a little more
descriptive to the log, rather than actually doing anything with the
event.
static void gap_handler(esp_bt_gap_cb_event_t event, esp_bt_gap_cb_param_t *params)
{
  switch (event) {
  case ESP_BT_GAP_CONFIG_EIR_DATA_EVT:
    ESP_LOGI(tag, "gap_handler event: ESP_BT_GAP_CONFIG_EIR_DATA_EVT");
    break;
  case ESP_BT_GAP_MODE_CHG_EVT:
    ESP_LOGI(tag, "gap_handler event: ESP_BT_GAP_MODE_CHG_EVT");
    break;
  default:
      ESP_LOGI(tag, "gap_handler event: %d", event);
      break;
  }
}
Run the code again and connect to the ESP32 using Bluetooth to see the following log messages:
I (1153) BT APP: Successfully enabled Bluetooth Controller
I (1163) BT APP: Successfully initialized Bluedroid stack
I (1223) BT APP: Successfully enabled Bluedroid stack
I (1233) BT APP: Successfully set the discoverability and connectability mode
I (1243) BT APP: Successfully registered callback function
W (1243) BT_BTC: A2DP Enable without AVRC
I (1253) BT APP: gap_handler event: ESP_BT_GAP_CONFIG_EIR_DATA_EVT
I (1293) BT APP: Successfully initialized A2DP sink
I (1293) BT APP: Successfully registered A2D handler function
W (91153) BT_HCI: hcif conn complete: hdl 0x80, st 0x0
W (91243) BT_HCI: hcif link supv_to changed: hdl 0x80, supv_to 8000
W (91433) BT_HCI: hcif link supv_to changed: hdl 0x80, supv_to 32000
W (91533) BT_HCI: hcif link supv_to changed: hdl 0x80, supv_to 8000
W (91543) BT_L2CAP: L2CAP - rcvd conn req for unknown PSM: 23
I (91543) BT APP: a2d_handler event: 0
I (91623) BT APP: a2d_handler event: 2
I (91623) BT APP: a2d_handler event: 5
W (91793) BT_APPL: new conn_srvc id:19, app_id:0
I (91803) BT APP: a2d_handler event: 0
W (91803) BT_BTC: AVRC not Init, not using it.
W (95003) BT_HCI: hci cmd send: sniff: hdl 0x80, intv(400 800)
W (95013) BT_HCI: hcif mode change: hdl 0x80, mode 2, intv 800, status 0x0
I (95013) BT APP: gap_handler event: ESP_BT_GAP_MODE_CHG_EVT
W (95123) BT_HCI: hci cmd send: unsniff: hdl 0x80
W (95173) BT_HCI: hcif mode change: hdl 0x80, mode 0, intv 0, status 0x0
I (95173) BT APP: gap_handler event: ESP_BT_GAP_MODE_CHG_EVT
W (98373) BT_HCI: hci cmd send: sniff: hdl 0x80, intv(400 800)
W (98393) BT_HCI: hcif mode change: hdl 0x80, mode 2, intv 800, status 0x0
I (98403) BT APP: gap_handler event: ESP_BT_GAP_MODE_CHG_EVT
That seems a bit more descriptive than event 10 and event 13. However,
you still really don’t know the details of the events. Fortunately,
the handler function also receives a pointer to a set of parameters of
type esp_bt_gap_cb_param_t. In the documentation you can see that
each event has an associated parameter structure. For the first event
in the log, ESP_BT_GAP_CONFIG_EIR_DATA_EVT, there is a parameter
struct called config_eir_data_param. Within this struct, there are
three public members: stat, eir_type_num, and eir_type. Update
the handler function to print the values of these parameters to the
monitor log.
/* Static function definitions */
static void gap_handler(esp_bt_gap_cb_event_t event, esp_bt_gap_cb_param_t *params)
{
  switch (event) {
  case ESP_BT_GAP_CONFIG_EIR_DATA_EVT:
    ESP_LOGI(tag, "gap_handler event: ESP_BT_GAP_CONFIG_EIR_DATA_EVT");
    ESP_LOGI(tag, "params->config_eir_data.stat: %d", params->config_eir_data.stat);
    uint8_t eir_type_num = params->config_eir_data.eir_type_num;
    ESP_LOGI(tag, "params->config_eir_data.eir_type_num: %d", eir_type_num);
    for (uint8_t i = 0; i < eir_type_num; i++) {
      ESP_LOGI(tag, "params->config_eir_data.eir_type[%d]: %d", i, params->config_eir_data.eir_type[i]);
    }
    break;
  case ESP_BT_GAP_MODE_CHG_EVT:
    ESP_LOGI(tag, "gap_handler event: ESP_BT_GAP_MODE_CHG_EVT");
    break;
  default:
      ESP_LOGI(tag, "gap_handler event: %d", event);
      break;
  }
}
In an nutshell, you first print out the stat integer, then you loop
through the array of eir_type and print each of its values as
well. Since there may be a variable number of eir_type items in the
array, you loop over the array eir_type_num times. When you run this
code on the ESP32 board, you’ll see the following information in the log.
I (1253) BT APP: gap_handler event: ESP_BT_GAP_CONFIG_EIR_DATA_EVT
I (1253) BT APP: params->config_eir_data.stat: 0
I (1263) BT APP: params->config_eir_data.eir_type_num: 4
I (1263) BT APP: params->config_eir_data.eir_type[0]: 9
I (1273) BT APP: params->config_eir_data.eir_type[1]: 3
I (1283) BT APP: params->config_eir_data.eir_type[2]: 5
I (1283) BT APP: params->config_eir_data.eir_type[3]: 7
I (1293) BT APP: Successfully initialized A2DP sink
I (1293) BT APP: Successfully registered A2D handler function
Interesting! First of all, the stat integer seems to be 0. By
looking that up in the documentation, you see that this refers to the
first item in the enum esp_bt_status_t, which is
ESP_BT_STATUS_SUCCESS. That sounds promising. You can also see in
the documentation that they call out two status enums that seem
important, ESP_BT_STATUS_SUCCESS, or enum 0, which you’ve already
seen, and ESP_BT_STATUS_EIR_TOO_LARGE, which is the last enum at
number 20. Update the code to include these two cases for easier
readability of the log messages
/* Static function definitions */
static void gap_handler(esp_bt_gap_cb_event_t event, esp_bt_gap_cb_param_t *params)
{
  switch (event) {
  case ESP_BT_GAP_CONFIG_EIR_DATA_EVT:
    ESP_LOGI(tag, "gap_handler event: ESP_BT_GAP_CONFIG_EIR_DATA_EVT");
    esp_bt_status_t stat = params->config_eir_data.stat;
    if (stat == ESP_BT_STATUS_SUCCESS) {
      ESP_LOGI(tag, "params->config_eir_data.stat: ESP_BT_STATUS_SUCCESS");
    } else if (stat == ESP_BT_STATUS_EIR_TOO_LARGE) {
      ESP_LOGI(tag, "params->config_eir_data.stat: ESP_BT_STATUS_EIR_TOO_LARGE");
    } else {
      ESP_LOGI(tag, "params->config_eir_data.stat: %d", stat);
    }
    uint8_t eir_type_num = params->config_eir_data.eir_type_num;
    ESP_LOGI(tag, "params->config_eir_data.eir_type_num: %d", eir_type_num);
    for (uint8_t i = 0; i < eir_type_num; i++) {
      ESP_LOGI(tag, "params->config_eir_data.eir_type[%d]: %d", i, params->config_eir_data.eir_type[i]);
    }
    break;
  case ESP_BT_GAP_MODE_CHG_EVT:
    ESP_LOGI(tag, "gap_handler event: ESP_BT_GAP_MODE_CHG_EVT");
    break;
  default:
      ESP_LOGI(tag, "gap_handler event: %d", event);
      break;
  }
}
This doesn’t change anything in the running of the code, but simply makes the log messages a bit more informative. When you run that again on the ESP32 you’ll see the following output:
I (1293) BT APP: gap_handler event: ESP_BT_GAP_CONFIG_EIR_DATA_EVT
I (1293) BT APP: params->config_eir_data.stat: ESP_BT_STATUS_SUCCESS
I (1303) BT APP: params->config_eir_data.eir_type_num: 4
I (1313) BT APP: params->config_eir_data.eir_type[0]: 9
I (1313) BT APP: params->config_eir_data.eir_type[1]: 3
I (1323) BT APP: params->config_eir_data.eir_type[2]: 5
I (1323) BT APP: params->config_eir_data.eir_type[3]: 7
I (1333) BT APP: Successfully initialized A2DP sink

I (1253) BT APP: gap_handler event: ESP_BT_GAP_CONFIG_EIR_DATA_EVT
I (1253) BT APP: params->config_eir_data.stat: ESP_BT_STATUS_SUCCESS
I (1263) BT APP: params->config_eir_data.eir_type_num: 4
I (1263) BT APP: params->config_eir_data.eir_type[0]: 9
I (1273) BT APP: params->config_eir_data.eir_type[1]: 3
I (1283) BT APP: params->config_eir_data.eir_type[2]: 5
I (1283) BT APP: params->config_eir_data.eir_type[3]: 7
I (1293) BT APP: Successfully initialized A2DP sink
I (1293) BT APP: Successfully registered A2D handler function
3.8. Connect to ESP32 (for real)
Do something similar to the ESP_BT_GAP_MODE_CHG_EVT events in the
gap_handler() function.
case ESP_BT_GAP_MODE_CHG_EVT:
  ESP_LOGI(tag, "gap_handler event: ESP_BT_GAP_MODE_CHG_EVT");
  uint64_t bt_address = 0; /* BT addresses are 48 bits long */
  for (uint8_t i = 0; i < ESP_BD_ADDR_LEN; i++) {
    bt_address = (bt_address << 8) | params->mode_chg.bda[i];
  }
  ESP_LOGI(tag, "Bluetooth Address: %llx", bt_address);
  ESP_LOGI(tag, "PM mode: %d", params->mode_chg.mode);
  break;
After running this code and connecting via Bluetooth from your phone, you’ll get the following output to the monitor log:
I (95023) BT APP: Bluetooth Address: e87f95XXXXXX
I (95023) BT APP: PM mode: 2
W (95123) BT_HCI: hci cmd send: unsniff: hdl 0x80
W (95173) BT_HCI: hcif mode change: hdl 0x80, mode 0, intv 0, status 0x0
I (95173) BT APP: gap_handler event: ESP_BT_GAP_MODE_CHG_EVT
I (95173) BT APP: Bluetooth Address: e87f95XXXXXX
I (95183) BT APP: PM mode: 0
W (98373) BT_HCI: hci cmd send: sniff: hdl 0x80, intv(400 800)
W (98393) BT_HCI: hcif mode change: hdl 0x80, mode 2, intv 800, status 0x0
I (98403) BT APP: gap_handler event: ESP_BT_GAP_MODE_CHG_EVT
I (98403) BT APP: Bluetooth Address: e87f95XXXXXX
I (98403) BT APP: PM mode: 2
This is indeed the Bluetooth address of the phone connected in this example, but yours will be a different address. The last 24 bits have also been obfuscated with the letter X.
3.9. Handle A2D events
Recall that you also saw some events sent to the a2d_handler().
I (91543) BT APP: a2d_handler event: 0
I (91623) BT APP: a2d_handler event: 2
I (91623) BT APP: a2d_handler event: 5
W (91793) BT_APPL: new conn_srvc id:19, app_id:0
I (91803) BT APP: a2d_handler event: 0
Implement some code to extract a bit more information about what those numbers 0, 2, and 5 mean, and whether there are some interesting parameters that come along with these events.
But first, there seems to be several places that parameters include a
Bluetooth address. Typically, these 48-bit addresses are printed in a
particular format when displayed to human beings. Specifically, 6
hexadecimal bytes separated by colons. Refactor the code a bit and
create a helper function that will return a formatted Bluetooth
address string when given an esp_bd_addr_t type.
/* Helper functions */
char *formatted_bt_addr(esp_bd_addr_t bt_addr)
{
  int chars;
  chars = snprintf(fmt_bt_addr, BT_ADDR_LEN, "%02x:%02x:%02x:%02x:%02x:%02x",
                   bt_addr[0], bt_addr[1], bt_addr[2], bt_addr[3], bt_addr[4], bt_addr[5]);
  if ((chars >= 0) && (chars < BT_ADDR_LEN)) {
    ESP_LOGI(tag, "Successfully wrote %d characters", chars);
  } else if (chars >= BT_ADDR_LEN) {
    ESP_LOGI(tag, "Tried to write %d chars, but truncated to %d chars", chars, BT_ADDR_LEN);
  } else if (chars < 0) {
    ESP_LOGE(tag, "Error writing BT address");
  }
  return fmt_bt_addr;
}
Now, you call formatted_bt_addr() to get a nicely formatted
Bluetooth address in the log files.
There are three A2DP events in the monitor log, namely
ESP_A2D_CONNECTION_STATE_EVT, ESP_A2D_AUDIO_CFG_EVT, and
ESP_A2D_SNK_PSC_CFG_EVT. As shown in the code below, add a handler
function, a2d_handler() that has a case for each of these events
and also the parameters that are being sent with it. Since this
process is very similar to the one you performed in gap_handler()
you should be able to see how the code below follows in the same
footsteps.
static void a2d_handler(esp_a2d_cb_event_t event, esp_a2d_cb_param_t *params)
{
  uint64_t bt_address = 0; /* BT addresses are 48 bits long */
  switch (event) {
  case ESP_A2D_CONNECTION_STATE_EVT:
    ESP_LOGI(tag, "a2d_handler event: ESP_A2D_CONNECTION_STATE_EVT");
    esp_a2d_connection_state_t state = params->conn_stat.state;
    if (state == ESP_A2D_CONNECTION_STATE_DISCONNECTED) {
      ESP_LOGI(tag, "Connection state: ESP_A2D_CONNECTION_STATE_DISCONNECTED");
    } else if (state == ESP_A2D_CONNECTION_STATE_CONNECTING) {
      ESP_LOGI(tag, "Connection state: ESP_A2D_CONNECTION_STATE_CONNECTING");
    } else if (state == ESP_A2D_CONNECTION_STATE_CONNECTED) {
      ESP_LOGI(tag, "Connection state: ESP_A2D_CONNECTION_STATE_CONNECTED");
    } else if (state == ESP_A2D_CONNECTION_STATE_DISCONNECTING) {
      ESP_LOGI(tag, "Connection state: ESP_A2D_CONNECTION_STATE_DISCONNECTING");
    }

    ESP_LOGI(tag, "Remote Bluetooth Address: %s", formatted_bt_addr(params->conn_stat.remote_bda));

    esp_a2d_disc_rsn_t disc_rsn = params->conn_stat.disc_rsn;
    if (disc_rsn == ESP_A2D_DISC_RSN_NORMAL) {
      ESP_LOGI(tag, "Successfully finished disconnection");
    } else if (disc_rsn == ESP_A2D_DISC_RSN_ABNORMAL) {
      ESP_LOGI(tag, "Abnormally disconnected, likely because of signal loss");
    }
    break;

  case ESP_A2D_AUDIO_CFG_EVT:
    ESP_LOGI(tag, "a2d_handler event: ESP_A2D_AUDIO_CFG_EVT");

    for (uint8_t i = 0; i < ESP_BD_ADDR_LEN; i++) {
      bt_address = (bt_address << 8) | params->audio_cfg.remote_bda[i];
    }
    ESP_LOGI(tag, "(ESP_A2D_AUDIO_CFG_EVT) Remote Bluetooth Address: %s",
             formatted_bt_addr(params->audio_cfg.remote_bda));
    ESP_LOGI(tag, "A2DP media codec type: %d", params->audio_cfg.mcc.cie.sbc[0]);
    ESP_LOGI(tag, "A2DP media codec type: %d", params->audio_cfg.mcc.cie.sbc[1]);
    ESP_LOGI(tag, "A2DP media codec type: %d", params->audio_cfg.mcc.cie.sbc[2]);
    ESP_LOGI(tag, "A2DP media codec type: %d", params->audio_cfg.mcc.cie.sbc[3]);

    break;
  case ESP_A2D_SNK_PSC_CFG_EVT:
    ESP_LOGI(tag, "a2d_handler event: ESP_A2D_SNK_PSC_CFG_EVT");
    ESP_LOGI(tag, "Protocol service capabilities configured: %llx", params->a2d_psc_cfg_stat.psc_mask);
    break;
  default:
    ESP_LOGI(tag, "a2d_handler event: %d", event);
    break;
  }
}
After flashing this code to the ESP32 and connecting via Bluetooth, you should see something similar to this in the log monitor.
I (1323) BT APP: Successfully initialized A2DP sink
I (1323) BT APP: Successfully registered A2D handler function
W (5893) BT_HCI: hcif conn complete: hdl 0x80, st 0x0
W (6073) BT_HCI: hcif link supv_to changed: hdl 0x80, supv_to 8000
W (6273) BT_HCI: hcif link supv_to changed: hdl 0x80, supv_to 32000
W (6373) BT_HCI: hcif link supv_to changed: hdl 0x80, supv_to 8000
I (6383) BT APP: a2d_handler event: ESP_A2D_CONNECTION_STATE_EVT
I (6383) BT APP: Connection state: ESP_A2D_CONNECTION_STATE_CONNECTING
I (6383) BT APP: Successfully wrote 17 characters
I (6383) BT APP: Remote Bluetooth Address: e8:7f:95:XX:XX:XX
I (6403) BT APP: Successfully finished disconnection
W (6453) BT_L2CAP: L2CAP - rcvd conn req for unknown PSM: 23
I (6523) BT APP: a2d_handler event: ESP_A2D_AUDIO_CFG_EVT
I (6523) BT APP: Successfully wrote 17 characters
I (6523) BT APP: (ESP_A2D_AUDIO_CFG_EVT) Remote Bluetooth Address: e8:7f:95:XX:XX:XX
I (6533) BT APP: A2DP media codec type: 33
I (6533) BT APP: A2DP media codec type: 21
I (6543) BT APP: A2DP media codec type: 2
I (6543) BT APP: A2DP media codec type: 53
I (6553) BT APP: a2d_handler event: ESP_A2D_SNK_PSC_CFG_EVT
I (6553) BT APP: Protocol service capabilities configured: 100060120
W (6653) BT_APPL: new conn_srvc id:19, app_id:0
I (6653) BT APP: a2d_handler event: ESP_A2D_CONNECTION_STATE_EVT
I (6653) BT APP: Connection state: ESP_A2D_CONNECTION_STATE_CONNECTED
I (6653) BT APP: Successfully wrote 17 characters
I (6653) BT APP: Remote Bluetooth Address: e8:7f:95:XX:XX:XX
I (6673) BT APP: Successfully finished disconnection
W (6673) BT_BTC: AVRC not Init, not using it.
W (9853) BT_HCI: hci cmd send: sniff: hdl 0x80, intv(400 800)
W (9863) BT_HCI: hcif mode change: hdl 0x80, mode 2, intv 800, status 0x0
I (9863) BT APP: gap_handler event: ESP_BT_GAP_MODE_CHG_EVT
I (9863) BT APP: Successfully wrote 17 characters
I (9863) BT APP: Bluetooth Address: e8:7f:95:XX:XX:XX
I (9883) BT APP: PM mode: 2
W (10023) BT_HCI: hci cmd send: unsniff: hdl 0x80
W (10703) BT_HCI: hcif mode change: hdl 0x80, mode 0, intv 0, status 0x0
I (10703) BT APP: gap_handler event: ESP_BT_GAP_MODE_CHG_EVT
I (10703) BT APP: Successfully wrote 17 characters
I (10703) BT APP: Bluetooth Address: e8:7f:95:XX:XX:XX
I (10713) BT APP: PM mode: 0
W (13903) BT_HCI: hci cmd send: sniff: hdl 0x80, intv(400 800)
W (13923) BT_HCI: hcif mode change: hdl 0x80, mode 2, intv 800, status 0x0
I (13923) BT APP: gap_handler event: ESP_BT_GAP_MODE_CHG_EVT
I (13933) BT APP: Successfully wrote 17 characters
I (13933) BT APP: Bluetooth Address: e8:7f:95:XX:XX:XX
I (13943) BT APP: PM mode: 2
3.10. Implement Audio/Video Remote Control Profile (AVRCP)
You’ve been able to connect your phone to the ESP32 using Bluetooth. However, the profile you’ve been using so far, A2DP, is for the streaming of high quality audio data, not for sending remote control commands like play, pause and volume up. The right Bluetooth profile for this these remote control commands is, appropriately, called Audio-Video Remote Control Profile (AVRCP) and you will set it up.
First, include the relevant header file from the ESP-IDF library.
#include "esp_avrc_api.h"
To use AVRCP you need to initialize it as both a controller and target. Then, register handlers for both as well. Note that you need to initialize AVRCP before A2DP if you want to use them both together, which is what you would like to do in this tutorial.
Create a function called init_avrcp_ct() to initialize the
controller and register an event handler callback function that you
will call avrcp_ct_handler().
static void init_avrcp_ct()
{
  ret = esp_avrc_ct_init();
  if (ret == ESP_OK) {
    ESP_LOGI(tag, "Successfully initialized the AVRCP controller module");
  } else if (ret == ESP_ERR_INVALID_STATE) {
    ESP_LOGE(tag, "Failed to initialize the AVRCP controller module: Bluetooth stack not yet enabled");
  } else {
    ESP_LOGE(tag, "Failed to initialize the AVRCP controller module: %s", esp_err_to_name(ret));
  }

  ret = esp_avrc_ct_register_callback(avrcp_ct_handler);
  if (ret == ESP_OK) {
    ESP_LOGI(tag, "Successfully registered avrcp_ct_handler callback function");
  } else {
    ESP_LOGE(tag, "Failed to register avrcp_ct_handler callback function: %s", esp_err_to_name(ret));
  }
}
Create another function called init_avrcp_tg() to initialize the
target functionality and register an event handler function called
avrcp_tg_handler().
static void init_avrcp_tg(void)
{
  ret = esp_avrc_tg_init();
  if (ret == ESP_OK) {
    ESP_LOGI(tag, "Successfully initialized the AVRCP target module");
  } else if (ret == ESP_ERR_INVALID_STATE) {
    ESP_LOGE(tag, "Failed to initialize the AVRCP target module: Bluetooth stack not yet enabled");
  } else {
    ESP_LOGE(tag, "Failed to initialize the AVRCP target module: %s", esp_err_to_name(ret));
  }

  ret = esp_avrc_tg_register_callback(avrcp_tg_handler);
  if (ret == ESP_OK) {
    ESP_LOGI(tag, "Successfully registered avrcp_tg_handler callback function");
  } else {
    ESP_LOGE(tag, "Failed to register avrcp_tg_handler callback function: %s", esp_err_to_name(ret));
  }
}
Next call these functions from app_main().
/* Initialize the AVRCP controller and target profiles */
init_avrcp_ct();
init_avrcp_tg();
Note again that this must be done before calling
init_a2dp().
Implement the simple handlers that you registered in the init functions so that you can see what kinds of events are being sent when starting up the ESP32.
static void avrcp_ct_handler(esp_avrc_ct_cb_event_t event, esp_avrc_ct_cb_param_t *params)
{
  ESP_LOGI(tag, "avrcp_ct_handler event: %d", event);
}

static void avrcp_tg_handler(esp_avrc_tg_cb_event_t event, esp_avrc_tg_cb_param_t *params)
{
  ESP_LOGI(tag, "avrcp_tg_handler event: %d", event);
}
Flash the new code to the ESP32 and you should see something similar to the below (some information cut for brevity).
I (1173) BT APP: Successfully enabled Bluetooth Controller
I (1183) BT APP: Successfully initialized Bluedroid stack
I (1253) BT APP: Successfully enabled Bluedroid stack
I (1263) BT APP: Successfully set the discoverability and connectability mode
I (1263) BT APP: Successfully registered gap_handler callback function
I (1273) BT APP: Successfully initialized the AVRCP controller module
I (1273) BT APP: Successfully registered avrcp_ct_handler callback function
I (1283) BT APP: Successfully initialized the AVRCP target module
I (1293) BT APP: Successfully registered avrcp_tg_handler callback function
W (1293) BT_BTC: A2DP Enable with AVRC
<---SNIP--->
I (5303) BT APP: avrcp_tg_handler event: 0
W (5363) BT_APPL: new conn_srvc id:19, app_id:0
I (5373) BT APP: a2d_handler event: ESP_A2D_CONNECTION_STATE_EVT
I (5373) BT APP: Connection state: ESP_A2D_CONNECTION_STATE_CONNECTED
I (5373) BT APP: Successfully wrote 17 characters
I (5373) BT APP: Remote Bluetooth Address: e8:7f:95:XX:XX:XX
I (5393) BT APP: Successfully finished disconnection
I (5413) BT APP: avrcp_ct_handler event: 0
I (5413) BT APP: avrcp_ct_handler event: 5
I (5413) BT APP: avrcp_tg_handler event: 1
W (8573) BT_HCI: hci cmd send: sniff: hdl 0x80, intv(400 800)
W (8583) BT_HCI: hcif mode change: hdl 0x80, mode 2, intv 800, status 0x0
I (8583) BT APP: gap_handler event: ESP_BT_GAP_MODE_CHG_EVT
I (8583) BT APP: Successfully wrote 17 characters
I (8583) BT APP: Bluetooth Address: e8:7f:95:XX:XX:XX
I (8603) BT APP: PM mode: 2
The AVRCP controller and target profiles were successfully initialized and you are receiving some events, namely events number 0 and 1 to the target and 0 and 5 for the controller. As you’ve probably figured out already, set up handlers for those specific events and figure out their parameters as well.
static void avrcp_ct_handler(esp_avrc_ct_cb_event_t event, esp_avrc_ct_cb_param_t *params)
{
  switch (event) {
  case ESP_AVRC_CT_CONNECTION_STATE_EVT:
    ESP_LOGI(tag, "avrcp_ct_handler event: ESP_AVRC_CT_CONNECTION_STATE_EVENT");
    if (params->conn_stat.connected == true) {
      ESP_LOGI(tag, "AVRC CT connection is set up");
    } else {
      ESP_LOGE(tag, "AVRC CT connection is not set up");
    }
    ESP_LOGI(tag, "(avrcp_ct_handler) Remote Bluetooth address: %s", formatted_bt_addr(params->conn_stat.remote_bda));
    break;
  case ESP_AVRC_CT_REMOTE_FEATURES_EVT:
    ESP_LOGI(tag, "acrcp_ct_handler event: ESP_AVRC_CT_REMOTE_FEATURES_EVT");
    ESP_LOGI(tag, "AVRC CT feature mask of remote device: %08lx", params->rmt_feats.feat_mask);
    ESP_LOGI(tag, "AVRC CT feature flag of remote device: %04lx", params->rmt_feats.tg_feat_flag);
    ESP_LOGI(tag, "AVRC CT Remote Bluetooth address: %s", formatted_bt_addr(params->rmt_feats.remote_bda));
    break;
  default:
    ESP_LOGI(tag, "avrcp_ct_handler_event: %d", event);
  }
}

static void avrcp_tg_handler(esp_avrc_tg_cb_event_t event, esp_avrc_tg_cb_param_t *params)
{
  switch (event) {
  case ESP_AVRC_TG_CONNECTION_STATE_EVT:
  ESP_LOGI(tag, "avrcp_tg_handler event: ESP_AVRC_TG_CONNECTION_STATE_EVENT");
    if (params->conn_stat.connected == true) {
      ESP_LOGI(tag, "AVRC TG connection is set up");
    } else {
      ESP_LOGE(tag, "AVRC TG connection is not set up");
    }
    ESP_LOGI(tag, "(avrcp_tg_handler) Remote Bluetooth address: %s", formatted_bt_addr(params->conn_stat.remote_bda));
    break;
  case ESP_AVRC_TG_REMOTE_FEATURES_EVT:
    ESP_LOGI(tag, "acrcp_tg_handler event: ESP_AVRC_TG_REMOTE_FEATURES_EVT");
    ESP_LOGI(tag, "AVRC TG feature mask of remote device: %08lx", params->rmt_feats.feat_mask);
    ESP_LOGI(tag, "AVRC TG feature flag of remote device: %04lx", params->rmt_feats.ct_feat_flag);
    ESP_LOGI(tag, "AVRC TG Remote Bluetooth address: %s", formatted_bt_addr(params->rmt_feats.remote_bda));
    break;
  default:
    ESP_LOGI(tag, "avrcp_tg_handler event: %d", event);
  }
}
4. Send audio data to ESP32 using A2DP
So far, you’ve set up a connection between the ESP32 and your phone. Why don’t you try to play some music on the phone and see what happens?
W (20683) BT_HCI: hcif mode change: hdl 0x80, mode 0, intv 0, status 0x0
I (20683) BT APP: gap_handler event: ESP_BT_GAP_MODE_CHG_EVT
I (20693) BT APP: Successfully wrote 17 characters
I (20693) BT APP: Bluetooth Address: e8:7f:95:b8:57:18
I (20703) BT APP: PM mode: 0
I (20703) BT_LOG: bta_av_link_role_ok hndl:x41 role:1 conn_audio:x1 bits:1 features:x864b

W (20713) BT_APPL: new conn_srvc id:19, app_id:1
I (20723) BT APP: a2d_handler event: 1
The log shows an a2d_handler() event, specifically event
number 1. This is the enum.
4.1. Handle audio state events
Implement a case for ESP_A2D_AUDIO_STATE_EVT and see what parameters
you can print to the log as well, just like you’ve done with the past
few events.
case ESP_A2D_AUDIO_STATE_EVT:
  ESP_LOGI(tag, "a2d_handler event: ESP_A2D_AUDIO_STATE_EVT");
  if (params->audio_stat.state == 0) {
    ESP_LOGI(tag, "audio state: ESP_A2D_AUDIO_STATE_REMOTE_SUSPEND");
  } else if (params->audio_stat.state == 1) {
    ESP_LOGI(tag, "audio state:  ESP_A2D_AUDIO_STATE_STOPPED");
  } else if (params->audio_stat.state == 2) {
    ESP_LOGI(tag, "audio state: ESP_A2D_AUDIO_STATE_STARTED");
  } else {
    ESP_LOGI(tag, "audio state: unknown");
  }
  break;
After adding the above case to the a2d_handler(), you get the
following log messages when you try to play and pause the music from
the phone.
W (22193) BT_HCI: hcif mode change: hdl 0x80, mode 0, intv 0, status 0x0
I (22193) BT APP: gap_handler event: ESP_BT_GAP_MODE_CHG_EVT
I (22203) BT APP: Successfully wrote 17 characters
I (22203) BT APP: Bluetooth Address: e8:7f:95:b8:57:18
I (22213) BT APP: PM mode: 0
I (22263) BT_LOG: bta_av_link_role_ok hndl:x41 role:1 conn_audio:x1 bits:1 features:x864b

W (22263) BT_APPL: new conn_srvc id:19, app_id:1
I (22273) BT APP: a2d_handler event: ESP_A2D_AUDIO_STATE_EVT
I (22273) BT APP: audio state: ESP_A2D_AUDIO_STATE_STARTED
I (40763) BT APP: a2d_handler event: ESP_A2D_AUDIO_STATE_EVT
I (40773) BT APP: audio state: ESP_A2D_AUDIO_STATE_REMOTE_SUSPEND
W (43963) BT_HCI: hci cmd send: sniff: hdl 0x80, intv(10 18)
W (43973) BT_HCI: hcif mode change: hdl 0x80, mode 2, intv 18, status 0x0
I (43973) BT APP: gap_handler event: ESP_BT_GAP_MODE_CHG_EVT
I (43983) BT APP: Successfully wrote 17 characters
I (43983) BT APP: Bluetooth Address: e8:7f:95:b8:57:18
I (43993) BT APP: PM mode: 2
First, there is an ESP_A2D_AUDIO_STATE_STARTED event when pressing
play. Then, an ESP_A2D_AUDIO_STATE_REMOTE_SUSPEND event when
pressing pause.
This seems logical, and things seem to work, but there is no music
playing anywhere, and no more event numbers that you can implement
cases for. If you look again at the ESP-IDF documentation for A2DP,
you’ll see another callback function you can register, called
esp_a2d_sink_register_data_callback(). It seems like this will
register A2DP data events, so why don’t you try to register a
handler and see what events pop out when trying to play some music.
4.2. Implement A2D data handler
First, add an initialization function.
static void init_a2dp_data_sink(void)
{
  ret = esp_a2d_sink_register_data_callback(a2d_data_handler);
  if (ret == ESP_OK) {
    ESP_LOGI(tag, "Successfully registered A2D data handler function");
  } else if (ret == ESP_ERR_INVALID_STATE) {
    ESP_LOGE(tag, "Failed to register A2D data handler function: Bluetooth stack not yet enabled");
  } else if (ret == ESP_FAIL) {
    ESP_LOGE(tag, "Failed to register A2D data handler function: callback is a NULL function pointer");
  } else {
    ESP_LOGE(tag, "Failed to register A2D data handler function: %s", esp_err_to_name(ret));
  }
}
Next, add a call to this function in app_main().
/* Initialize the A2DP data sink */
init_a2dp_data_sink();
And finally, create a new handler function.
static void a2d_data_handler(const uint8_t *buf, uint32_t len)
{
  ESP_LOGI(tag, "We've received %d bytes of music data!", len);
}
See if there’s anything showing up in the logs when you connect and play some music:
W (21684) BT_HCI: hcif mode change: hdl 0x80, mode 0, intv 0, status 0x0
I (21684) BT APP: gap_handler event: ESP_BT_GAP_MODE_CHG_EVT
I (21694) BT APP: Successfully wrote 17 characters
I (21684) BT APP: Bluetooth Address: e8:7f:95:b8:57:18
I (21704) BT APP: PM mode: 0
I (21744) BT_LOG: bta_av_link_role_ok hndl:x41 role:1 conn_audio:x1 bits:1 features:x864b

W (21744) BT_APPL: new conn_srvc id:19, app_id:1
I (21754) BT APP: a2d_handler event: ESP_A2D_AUDIO_STATE_EVT
I (21754) BT APP: audio state: ESP_A2D_AUDIO_STATE_STARTED
I (21974) BT APP: We've received 4096 bytes of music data!
I (21974) BT APP: We've received 4096 bytes of music data!
I (21974) BT APP: We've received 4096 bytes of music data!
<---SNIP--->
I (32034) BT APP: We've received 4096 bytes of music data!
I (32044) BT APP: We've received 4096 bytes of music data!
I (32054) BT APP: We've received 4096 bytes of music data!
I (32124) BT APP: a2d_handler event: ESP_A2D_AUDIO_STATE_EVT
I (32124) BT APP: audio state: ESP_A2D_AUDIO_STATE_REMOTE_SUSPEND
W (35324) BT_HCI: hci cmd send: sniff: hdl 0x80, intv(10 18)
W (35354) BT_HCI: hcif mode change: hdl 0x80, mode 2, intv 18, status 0x0
I (35364) BT APP: gap_handler event: ESP_BT_GAP_MODE_CHG_EVT
I (35364) BT APP: Successfully wrote 17 characters
I (35364) BT APP: Bluetooth Address: e8:7f:95:b8:57:18
I (35374) BT APP: PM mode: 2
Nice! You’re receiving buffer after buffer with music from the phone. Each buffer is 4096 bytes. However, you still don’t hear any music. You will have to send those bytes to your Digital to Analogue Converter (DAC), and the way to do that is to use the ESP32’s I2S peripheral.
5. Send audio data from ESP32 to DAC
5.1. Implement data structure to queue audio stream data
You need a way to send the incoming music data to the I2S peripheral as the data is being received. The data is a stream, and you can not be sure how much data is coming. The player may play forever, or stop the next moment. A useful pattern for this type of problem is to send messages between two tasks through a queue data structure.
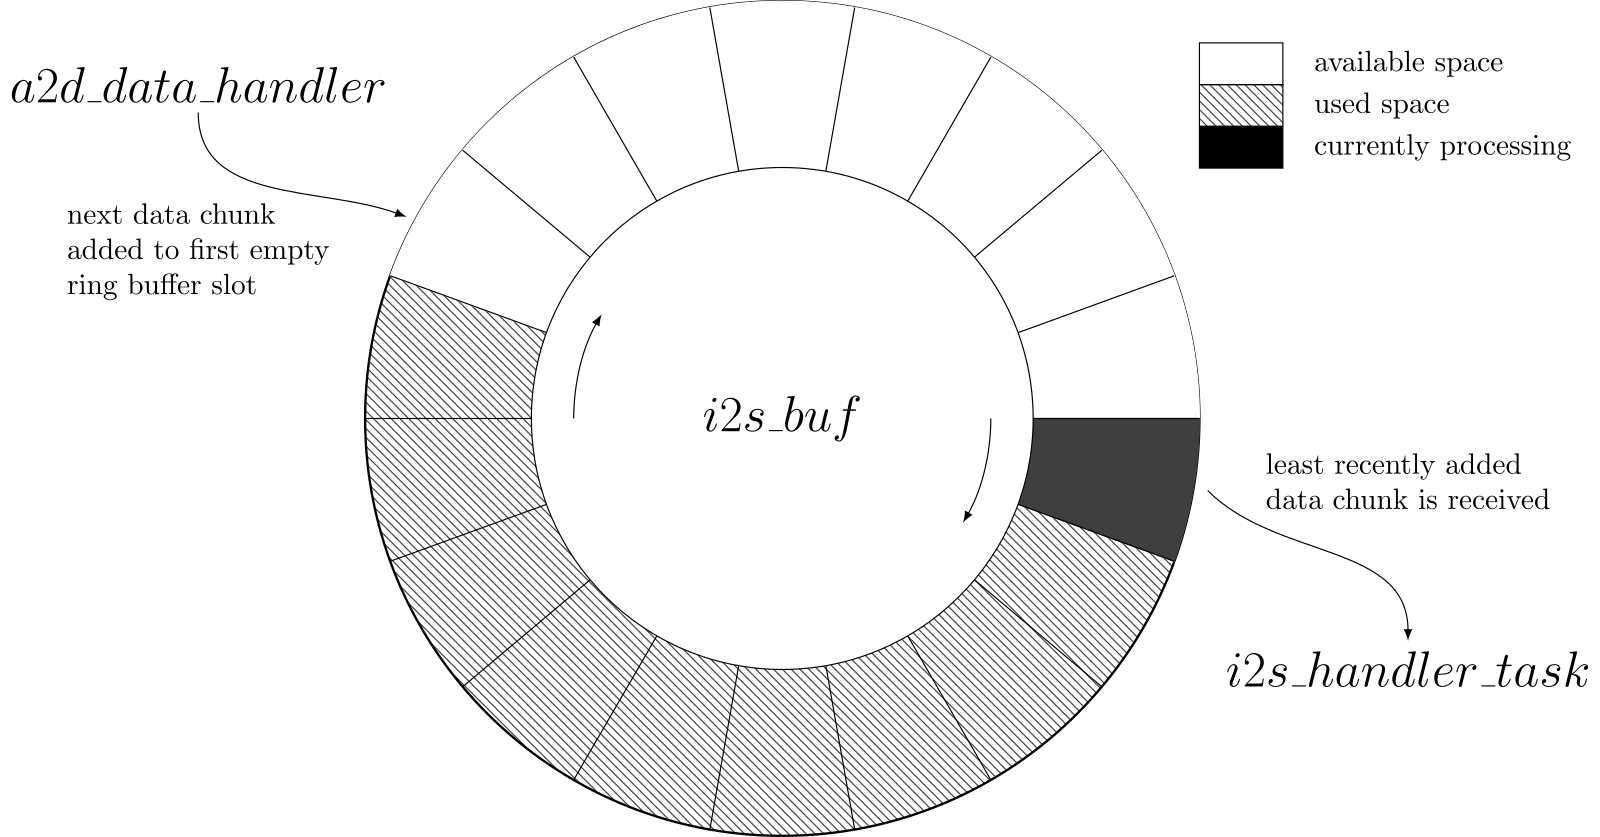
Figure 2: New data chunks are added to the first empty ring buffer slot and the least recently added data chunks are removed. When the buffer is full, no more data chunks can be added until another slot is freed up.
FreeRTOS provides a queue data type, so you can use them instead of creating your own. However, ESP-IDF provides an even better option, called a Ring Buffer that will suit your needs very nicely.
5.2. Initialize I2S peripheral
Note: There were several changes to the I2S peripheral APIs when
ESP-IDF version 5.0 was released. This tutorial uses the new style of
APIs, so if you are using an older version of ESP-IDF you may have to
change some of these settings. Please see this link for details of
what changed between versions.
First, initialize the I2S peripheral with settings regarding the
bit-rate, which IO ports to use and so forth. In the new version of
the ESP-IDF API you first declare a variable to store the handle for
the new channel you will create. Make sure to include the standard
header for I2S, #include "driver/i2s_std.h", not the legacy header
#include "driver/i2s.h".
i2s_chan_handle_t tx_channel;
Then, create a new function, i2s_init() that will initialize all the
required settings. First, define the ESP32 GPIO pins to use for I2S.
#define I2S_GPIO_BCLK (21)    /* I2S Bit Clock GPIO pin */
#define I2S_GPIO_WS (5)       /* I2S Word Select (LRCLK) GPIO pin */
#define I2S_GPIO_D_OUT (19)   /* I2S Data Out GPIO pin */
Note: These are not the default pins used in the ESP-IDF examples, but they fit better with the PCB layout for the example board that accompanies this tutorial. You can choose to use different GPIO pin configurations.
Next, implement i2s_init().
static void init_i2s(void) {
  i2s_chan_config_t channel_config = I2S_CHANNEL_DEFAULT_CONFIG(I2S_NUM_0, I2S_ROLE_MASTER);
  channel_config.auto_clear = true; /* Automatically clear DMA TX
                                       buffer */
  i2s_std_config_t standard_config = {
    .clk_cfg = I2S_STD_CLK_DEFAULT_CONFIG(44100),
    .slot_cfg = I2S_STD_MSB_SLOT_DEFAULT_CONFIG(I2S_DATA_BIT_WIDTH_16BIT, I2S_SLOT_MODE_STEREO),
    .gpio_cfg = {
      .mclk = I2S_GPIO_UNUSED,
      .bclk = I2S_GPIO_BCLK,
      .ws = I2S_GPIO_WS,
      .dout = I2S_GPIO_D_OUT,
      .din = I2S_GPIO_UNUSED,
      .invert_flags = {
        .mclk_inv = false,
        .bclk_inv = false,
        .ws_inv = false,
      },
    },
  };
  ret = i2s_new_channel(&channel_config, &tx_channel, NULL);
  if (ret == ESP_OK) {
    ESP_LOGI(tag, "Successfully allocated new I2S channel");
  } else if (ret == ESP_ERR_NOT_SUPPORTED) {
    ESP_LOGE(tag, "Failed to allocate new I2S channel: Communication mode not supported");
  } else if (ret == ESP_ERR_INVALID_ARG) {
    ESP_LOGE(tag, "Failed to allocate new I2S channel: NULL pointer or illegal argument in i2s_chan_config_t");
  } else if (ret == ESP_ERR_NOT_FOUND) {
    ESP_LOGE(tag, "Failed to allocate new I2S channel: No available I2S channel found");
  } else {
    ESP_LOGE(tag, "Failed to allocate new I2S channel: %s", esp_err_to_name(ret));
  }

  ret = i2s_channel_init_std_mode(tx_channel, &standard_config);
  if (ret == ESP_OK) {
    ESP_LOGI(tag, "Successfully initialized I2S channel");
  } else if (ret == ESP_ERR_NO_MEM) {
    ESP_LOGE(tag, "Failed to initialize I2S channel: No memory to store channel information");
  } else if (ret == ESP_ERR_INVALID_ARG) {
    ESP_LOGE(tag, "Failed to initialize I2S channel: NULL pointer or invalid configuration");
  } else if (ret == ESP_ERR_INVALID_STATE) {
    ESP_LOGE(tag, "Failed to initialize I2S channel: This channel is not recognized");
  } else {
    ESP_LOGE(tag, "Failed to initialize I2S channel: %s", esp_err_to_name(ret));
  }

  ret = i2s_channel_enable(tx_channel);
  if (ret == ESP_OK) {
    ESP_LOGI(tag, "Successfully enabled channel");
  } else if (ret == ESP_ERR_INVALID_ARG) {
    ESP_LOGE(tag, "Failed to enable channel: NULL pointer");
  } else if (ret == ESP_ERR_INVALID_STATE) {
    ESP_LOGE(tag, "Failed to enable channel: Channel not initialized or already started");
  } else {
    ESP_LOGE(tag, "Failed to enable channel: %s", esp_err_to_name(ret));
  }
}
Call this function from app_main().
/* Initialize I2S peripheral */
init_i2s();
If everything went ok, after building and flashing the ESP32 you should see the following messages.
I (1460) BT APP: Successfully allocated new I2S channel
I (1470) BT APP: Successfully initialized I2S channel
I (1470) BT APP: Successfully enabled channel
You now have data streaming in via Bluetooth from your phone. You have your ESP32 configured with a stereo channel output using the I2S peripheral. The only thing remaining is to send the incoming music data to the I2S peripheral, and the ESP32’s Direct Memory Access controller will do the heavy lifting of actually shipping the bytes off to your DAC.
5.3. Send data to I2S peripheral
To send audio data to the I2S peripheral, you will use some of the FreeRTOS functionality on the ESP32, namely tasks. You will create a task to retrieve music data from the ring buffer as the A2DP data event handler writes audio data to that same ring buffer.
First, declare handles for the ring buffer and task:
static RingbufHandle_t i2s_buf = NULL;
static TaskHandle_t i2s_handle = NULL;
Next, create the ring buffer and I2S task at the end of init_i2s():
<---SNIP--->
/* Setup ring buffer for audio data */
i2s_buf = xRingbufferCreate(8192, RINGBUF_TYPE_BYTEBUF);
if (i2s_buf == NULL) {
  ESP_LOGE(tag, "Failed to create ring buffer for I2S");
}

/* Create I2S task handler */
BaseType_t task_ret = xTaskCreate(i2s_handler, "I2S Task", 1024, NULL, configMAX_PRIORITIES - 3, &i2s_handle);
if (task_ret == pdPASS) {
  ESP_LOGI(tag, "Successfully created I2S handler task");
} else {
  ESP_LOGE(tag, "Failed to create I2S handler task: %s", task_ret);
}
Update the a2d_data_handler() function to include a call to send
the audio data to the i2s_buf buffer.
static void a2d_data_handler(const uint8_t *buf, uint32_t len)
{
  ESP_LOGD(tag, "We've received %d bytes of music data!", len);

  // Send data to ring buffer
  xRingbufferSend(i2s_buf, (void *)buf, len, (TickType_t)portMAX_DELAY);
}
Finally, write a handler function that will run in the I2S task
using a never ending for loop.
static void i2s_handler(void *arg)
{
  uint8_t *data = NULL;
  size_t size = 0;
  size_t bytes_written = 0;

  for (;;) {
    data = (uint8_t *)xRingbufferReceive(i2s_buf, &size, (TickType_t)portMAX_DELAY);
    if (size != 0) {
      i2s_channel_write(tx_channel, data, size, &bytes_written, portMAX_DELAY);
      vRingbufferReturnItem(i2s_buf, (void *)data);
    }
  }
}
And that should be it. Now, you are able to play audio from your phone via Bluetooth to your ESP32 and on to your DAC and output amplifier. Well done, give yourself a nice pat on the back if you’ve gotten this far!
Now, of course, there are many things you can do to improve both the code and the functionality. In later tutorial installments, you may explore further functionality, for example:
- Prevent unauthorized devices from connecting to the ESP32.
- Put the ESP32 into a sleep mode to save power when nothing is happening.
- Capture audio meta-data, such as song title and artist, from the device to display on the ESP32.
- Implement remote control functionality on the ESP32.
6. Further exercises
If you would like to do some more clean-up of the code, you can modify
the level of logging that is output using the idf.py menuconfig
option Component Config -> Log output -> Default log verbosity. You
can choose whichever level you’d like. So far, you have only used up
to Info logging level, even though some of the things you logged
should have been classified as Debug or even Verbose. Change some
of the ESP_LOGX macros to use more appropriate levels.
There are also plenty of opportunities for refactoring the code, especially to break up some of the longer functions into separate files and also remove some of the magic numbers in the code. Good luck!
7. References
This tutorial was made possible thanks to existing documentation:
- The ESP-IDF Bluetooth Service Discovery and A2DP sink examples.
- The ESP-IDF API Reference.
- The ESP32 Bluetooth Architecture documentation.
- The Bluetooth Core Specification.

This work is licensed under a Creative Commons Attribution-ShareAlike 4.0 International License.